Getting the Exhaust Job Done Right
There are a lot of little things that go into the successful installation of an exhaust system. One important step is neutralizing the exhaust system to avoid placing unnecessary stress on the hangers and isolators and ensure that there are proper clearances. During the installation, first install the bolts loosely before tightening everything up at the end of the process.
Doing this allows you to make the necessary adjustments to ensure that the proper clearances are present and that the exhaust is exiting the vehicle properly. If the exhaust system isn’t assembled properly, it can cause the exhaust gases to enter the cabin area especially if the tailpipe isn’t exiting outside of the body. Here are some areas that you should examine before tightening everything up.
Clearances
Depending on how they are attached, areas with potential metal-to-metal contact should have 1/4" to 1/2" clearance. You need this clearance so it can move side to side with the movement of the drivetrain and grow in length as it heats up. For non-metal components that aren’t designed to handle heat, you should allow 2" to 3" of clearance. In addition, ensure that the exhaust system isn’t coming in contact with a plastic bumper or fascia which could potentially melt these components on longer trips.
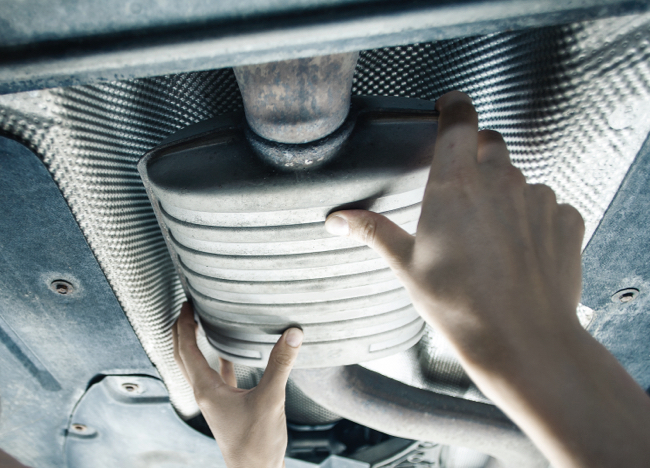
Exhaust Hangers
Inspect the exhaust hangers which are typically composed of metal rods attached to the exhaust system & body, and rubber isolators. These components can be adjusted and/or replaced. Exhaust isolators need to be able to handle several hundred pounds of dynamic force and over time they can stretch and fail causing damage to other parts. Even if the old isolators look okay, they may be damaged and won’t support the exhaust system as originally designed.
It is a good practice to replace all the isolators each time you install a complete exhaust system or any major exhaust components. Doing this allows you to potentially obtain equal distribution of the load of the exhaust system. If you only change a couple of the isolators, there is a chance that it will only be supporting a portion of the system.
During installation, examine the metal rods or hangers welded to the exhaust system and to the body; during shipping or with time, they can become bent out of proper position. Consequently, you may have to bend the rod and/or hanger to get the proper clearance and to ensure the system is neutralized properly. To ensure the system is neutralized properly, examine the isolators when the exhaust system is cold; they should all be loaded equally and angled slightly forward. Once the exhaust system heats up to normal operating temperature it will grow, and the isolators should be hanging straight up and down.
Slip-Fit Connections
For slip-fit connections, mark the OD pipe 1-1/2" from the end to signal the minimum insertion point. Avoid completely inserting slip-fit connections until they stop; but rather, adjust the insertion so that all hangers are neutralized and the tailpipe is exiting correctly outside of the vehicle body.
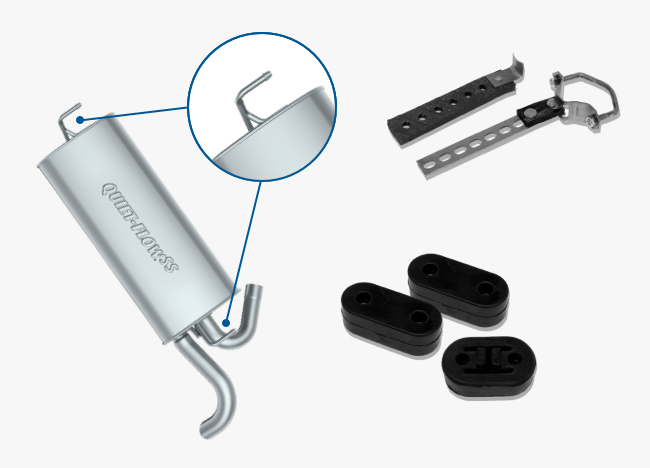
Flanged Connections and Mounting Hardware
Most flanged connections utilize some kind of gasket, and it is important that all mounting bolts for these types of connections are torqued evenly and properly. Overtorquing or failure to equally tighten these bolts will result in premature gasket failure. In addition, make sure that there are no missing or broken bolts, especially on close coupled manifold type converters which are mounted directly to the engine at the top and secured at the bottom of the engine with a bracket and bolt.
To prevent premature failure of the manifold converter or down pipe due to vibration, it is extremely important to ensure that the lower bracket and bolt is in place and secured to the engine block. In cases where the bolt is left out, flex of the engine and exhaust system is transferred to the manifold converter assembly rather than the flex pipe that is designed to handle it. Install the bolt/bracket loosely until the exhaust system is completely installed and neutralized/adjusted properly.
Making Adjustments
Prior to completely securing all hardware, you may need to make slight fitment adjustments. Use composite shims (tree felling wedges work well) to help maintain clearances. Once everything is properly centered and aligned, complete the final torquing of all bolts, brackets and clamps.
Pro Tip
If you’re having continued failures of flex pipe, make sure to inspect all engine, transmission and subframe mounts for wear or excessive movement.
Learn more about quality exhaust parts, find the right car part, or find a local repair shop today.
The content in this article is for informational purposes only. You should consult with a certified technician or mechanic if you have questions relating to any of the topics covered herein. Tenneco will not be liable for any loss or damage caused by your reliance on any content.